How To Set Up A Christmas Light Display

Decorating for the holidays is fun when you’ve got the tips and tricks to getting it done right. Check out our tips on hanging holiday lights safely, efficiently, and beautifully!


How To Set Up A Christmas Light Display

Map It Out

The first step to a great holiday home is to figure out how many lights you need. Measure windows, railings, roofs and more to understand the areas you want to cover in lights. For trees and shrubs we suggest 100 lights for every 1 and a half feet of shrub. If you are reusing lights, test them with your Gardner Bender Range Tester before hanging them up. Be sure to also check for signs of wear and tear as that could be hazardous to your setup. If there are broken or burnt out bulbs, get those replaced before going up on your home.

Clip It

From windows to railings, getting a variety of clips to suit the spot on your home is key to decorating with lights. Clips not only hold the lights in place you are also insuring the lights will avoid any wear and tear of being replaced next year. Space the clips about 8 inches apart to avoid drooping strands.  Make sure you are using the right clip for the correct location. Roof line clips will work differently than window clips.  Get the correct clip and you will avoid the headache of restringing your lights later.  Do not use staples when attaching lights as they can damage the cords.

Hang The Lights

When placing the holiday lights in the clip, make sure the plug end is closest to the power source. This will help avoid cords being exposed around your decoration setup.  Always use outdoor extension cords and outdoor power source. An outdoor timer is a great option to add to your connection to keep your lights on during your preferred display times.

What To Plant in August on the Outer Banks

Summer is coming to a close and planning for the Fall begins. This month in the garden we are preparing for that Fall chili and those homecoming mums. We will be planting, planning, and pruning!

In The Garden This August on the Outer Banks


FOOD

Kale: Plant your Kale 1/4 – 1/2 deep and 6-8 weeks before the first frost. Kale can tolerate lots of sun or shady pots. It is easy to grow and healthy to eat!

Broccoli: Plant your broccoli 3-4 weeks before the first frost for a bushy bushel. Allow your broccoli equal shade to sunlight for best growth.

Brussels Sprouts: Brussels Sprouts need to be planted 6-8 weeks before the first frost. They make an excellent for a fall harvest and taste amazing on the grill!


FLOWERS

Coneflower: These lovely Sunflower look-a-likes come in a variation of colors. From pink, red, yellow, and even blue. They will brighten up your Summer garden and set you up for Fall. These flowers love the well-drained soils and thrive in the heat.

Mums:  A classic flower like the Mum is darling in any garden. The flowers look beautiful potted by the doorway, handing on your balcony, or planted in the garden. These medium height flowers require 8-1o hours of sunlight a day.

Geranium: Geranium‘s are a colorful flower. You can choose them in many colors to match any setting. These flowers require only 4-6 hours of sunlight and lots of water drainage. Geranium is the perfect apartment flower to liven up your space.


PRUNE

Tomatoes: Summer means tomatoes and if you have been growing yours, it is time to prune those shoots. Be sure not to clip any roots or new growth vines.


Here are some helpful home maintenance tips for this month by Lou Manfredini, Ace’s Home Expert.

July Home Checklist

  • Take Care Of The Bugs

    • Grubs in your lawn can leave it looking terrible and also invite rodents who eat them.  Treat your lawn with a grub treatment to keep them at bay.
    • Ants are another issue that needs to be attacked with shakes around your home, foaming sprays in nooks and crannies and bait traps inside. When big storms come in ants get washed out and head indoors for protection.
    • Mosquitoes are also a huge pain as the weather warms up in many parts of the country.  You can treat your lawn and shrubs with a hose end treatment that can last two weeks and use mosquito dunks in any standing water around your home to eliminate mosquitoes before they mature.
  • Hose Down Your A/C Unit Outside

    • Your condensing unit can get clogged with debris. From lawn clippings to leaves, it’s time to give it a clean to keep it working properly vs. overworking.  Shut the system off and use a hose and sprayer and start and the top and clean it off with just water.  This will boost efficiency and help keep an emergency repair from being needed.  And while you’re at it, make sure the filter is clean too.
  • Treat Mildew and Mold

    • Treat the mildew and mold off the roof and side of your home with a treatment that works with mother nature to keep things clean.  Some offer hose end options so you can safely stay on the ground and spray up to 30 feet.
  • Re-coat Your Asphalt Driveway

    •  Clean it off really well using either a pressure washer or dish soap and a broom and rinse.  Fill the cracks and patch any larger holes with asphalt patching.  Then spread out the new sealer once the repairs are set, usually a day or so.  You can either use a driveway broom or squeegee.
  • Wash The Windows

    •  This is a pain to do, but the benefits of clean glass are terrific. I like using warm water with a small amount of dish soap.  Wash the windows with a microfiber towel. Then polish it with a dry microfiber towel you’ll be amazed. If windows are high up, attach a window cleaner to a hose to spray and address the top windows.
How To Make Ribs On The Traeger

Here is an amazing way to make ribs! by Chef Jason from 5280 Culinary

Print Recipe Here Lip Smackin Ribs

Yield: 4 Racks of Ribs

Prep time: 20 Minutes Prep

Total time: 6 Hours Minute cook time

Ingredients

Measure   Ingredient                                                                                    Prep Notes      

4 Racks        Ribs, Pork, Baby Back or St. Louis Sparerib                Membrane peeled

Taste            Rub A Dub Rub, 5280 Culinary

Taste            Oink Rub, 5280 Culinary

Taste            High Altitude BBQ Sauce, 5280 Culinary                     Robust BBQ Sauce Flavor

or

Taste            Low Country BBQ Sauce, 5280 Culinary                     Carolina Mustard Flavor

Or

Taste            Happy Ending BBQ Sauce, 5280 Culinary                  Asian BBQ Flavor

Prep Directions:

  • Buy Fresh ribs and be sure to remove the membrane on the rib side of the rack
  • TIP – for easily removal of the membrane
    • Peel a corner of the membrane back
      • We use a dull butter knife to get under between the membrane and rib
    • Grab the membrane corner with a napkin or paper towel, grab firm
    • Pull the membrane back using a firm consistent pull
      • If membrane tears, don’t sweat it. Grab the dull butter knife and start again
    • Discard membrane
  • TIP – for a more robust flavor
    • Season the ribs, wrap and refrigerate for 6-12 hours (or overnight)


RIB Notes:

  • Baby Back Ribs
    • Most tender and most lean ribs
    • Connected to the backbone and nestled under the loin muscle
    • Slab usually contains 10 to 13 bones, bones tend to be curved
  • Spareribs AKA St. Louis Style or St. Louis Cut
    • Very tender and contain more heavier bones and more pork fat
    • Connected to the lower belly area
    • Trimmed of breastbone and rib tips/cartilage
    • Slab usually contains 11 bones


Cooking Directions:

  1. Rub Directions:
    1. Peel the rib membrane and place onto a cooking sheet
    2. Sprinkle the desired amount of 50/50 blend of Rub A Dub and Oink rub onto the meat side and allow to become tacky and wet
    3. Turn the ribs over and sprinkle the desired amount of 50/50 Blend of Rub A Dub and Oink onto the rib side and allow to become tacky and wet
    4. Allow the rub to sit for 20 minutes before smoking
      1. TIP – for a more robust flavor
      2. Season the ribs, wrap and refrigerate for 6-12 hours (or overnight)
    5. Traeger Smoking Directions:
      1. Fill hopper with your favorite pellets or pellet blend recipe – We used Big Game Blend
      2. Turn the Traeger ON to smoke setting and allow smoke to start
      3. Once smoke has started place the ribs meat side up and smoke for 3 hours with the lid closed
      4. At the 3 hour mark remove the ribs to the cooking sheet
      5. Close the lid to the Traeger and turn temp to 225 degrees
      6. Adjust the seasoning on the ribs if desired
      7. Brush both sides of the ribs with High Altitude BBQ Sauce, then drizzle with Low Country BBQ Sauce, then wrap tightly in peach butcher paper
      8. Ensure the ends and seams are well sealed to prevent leaking. We suggest folding seams and edges to face upwards
      9. Place the ribs back onto the Traeger and cook for approx. 2 hours
      10. Check the pellet hopper to ensure pellets are full
      11. At the 2 hour mark remove the ribs to the cookie sheet, meat side up and remove the foil
        1. Ribs should have pulled back from the tips of the ribs and have some resistence or pull. We like our ribs to have more chew versus falling off the bone
      12. Season, sauce or honey glaze as needed and place back onto the Traeger
      13. Cook for an additional 45 minutes to 1 hour to set the sauce or glaze
      14. Enjoy

Grills / Grill Gear Used:

  • Traeger Pro 34 Ace SKU – 8474934
  • Traeger Big Game Blend Pellets Ace SKU – 8555021
  • Traeger Peach Butcher Paper Ace SKU – 8687162

Products Used:

  • Rub A Dub, 5280 Culinary Ace SKU – 8562050
  • Oink, 5280 Culinary Ace SKU – 8562043
  • High Altitude BBQ Sauce Ace SKU – 8560088
  • Low Country BBQ Sauce Ace SKU – 8560252
  • Happy Ending BBQ Sauce Ace SKU – 8560245
Here are 10 ideas for your home that might make 2020 a little brighter, happier and even help save you some money.

Here are 10 ideas for your home that might make 2020 a little brighter, happier and even help save you some money.

Here is an amazing way to wow your family on Thanksgiving! Ace Grilling Experts show you how to cook the perfect Thanksgiving Turkey on a Traeger.

Here is an amazing way to wow your family on Thanksgiving! Ace Grilling Experts show you how to cook the perfect Thanksgiving Turkey on a Traeger.

Save big on Grills & Smokers! Holiday Sale runs 11/11 – 12/2. Save on all grills!

FREE Grill Assembly and Delivery –We offer Free assembly and delivery on grills and accessories over $399


Traeger Smoked Pumpkin Seeds Recipe

Take those Pumpkin seeds and put them to good use.  Fire up the Traeger, load the hopper and let’s add some smoke flavored fun to pumpkin carving time.


Yield: Serves 8-10 People
Prep time: 5-7 Minutes
Cook time:  20 Minutes on 180 Degree Smoke setting / 30 Minutes at 325 Degrees

Ingredients

Measure            Ingredient                                        Prep Notes      

1 Ea                     Pumpkin, LARGE                                                    

As Needed        Oil, Olive Blend                                                                                    

As Needed       Oink Rub, 5280 Culinary

                    CHEF TIPS: TRY THESE OTHER GREAT RUB FLAVORS                      

Cooking Notes:

  • This can be done on the Traeger, Weber or Big Green Egg

  • Add some smoke to build flavor. Smoke tube, smoke box or smoker cubes

  • Temps remain the same for Traeger, Weber or Big Green Egg

Cooking Directions:

  • Preheat your Traeger to 180 Degrees

  • Carve pumpkin and place seeds and guts into a large bowl

  • Rinse guts under cold water and remove pulp, strings and seeds

    • Place seeds onto a paper towel

    • Allow seeds to dry before seasoning

  • Place the dried seeds into a bowl, coat LIGHTLY with oil, then season to taste as light or as heavy as you desire

  • Place onto the Kingsford Pan and arrange in a shallow layer

  • Place pan into the pre-heated Traeger at 180 degrees – Smoke for approx. 20 minutes

    • Smoke lighter or heavier if desired

  • Turn Traeger to 350 degrees (leave pan in Traeger)

  • Using insulated gloves or tongs, carefully stir the seeds after 15 minutes

  • Allow to roast for another 15-20 minutes or until desired doneness is reached

  • Using insulated gloves or tongs, carefully remove the pan, stir one last time and allow to cool

  • Store in an airtight container after completely cooled Shelf life is 4 days

Grills / Grill Gear Used:

Hurricane preparedness checklist

Be prepared for the huricane season. From generators to flashlights, we’ve got you covered! Stop in at any of our six convenient Outer Banks locations and our ACE experts will help you assemble & prepare for a natural weather disaster.

Hurricane preparedness checklist


For the latest updates on Hurricane Dorian please go to :

https://www.darenc.com/departments/emergency-management/hurricane-dorian

  • A mandatory evacuation has been issued for all Dare County visitors beginning Tuesday, September 3 at 12:00 p.m.
  • A mandatory evacuation order for all Dare County residents becomes effective at 6:00 a.m. on Wednesday, September 4.
  • A ban on ocean swimming is in place due to dangerous surf conditions and strong rip currents along the beaches. Everyone must stay out of the water as it is unsafe for even the most experienced swimmers.
  • Dare County Schools will be closed Wednesday, September 4 through Friday,  September 6.
  • Dare County Government Offices will be be open from 8:30 a.m. to 5:00 p.m. on Tuesday, September 3 and from 8:30 a.m. to noon on Wednesday, September 4. County Offices will close at noon on Wednesday.


Creating Your Outdoor Space

By choosing the right furniture, you can extend your living space and create the perfect atmosphere for family and guests to enjoy your deck, patio or porch. Use this guide to buying a patio set or choosing patio furniture that will make your patio, deck or porch irresistible,  season after season.

1: Planning your Space

Even the most stylish furniture won’t make your guests comfortable if your deck is crammed too full to move around. So, before you go shopping for patio furniture, measure your space and plot out how much room is needed for traffic and empty space. The amount you’re left over with will help you choose furniture that’s sized for  your space. Try these tips:

  • Allow about 3’ of space to give people room to pass one another safely and comfortably in spots where they will be moving, serving food or dining.
  • Allow about 2’ of space around furniture.
  • Allow about 1.5’ of space between an ottoman and chair or a table and sofa.

2: Set Up Zones

Decide what you’ll do most often, and plan your outdoor space around that activity. Keep in mind, the furniture you select for the main “zone” could be the focal point, or, may be out of the way, but may take up the most space. Then, plan out secondary spaces for the activities you’ll do occasionally. Here are some examples of how you can plan to select and arrange your patio set:

  • If grilling out and entertaining is your main activity – Your grill, smoker and fryer may be a main element in the space. You may not want it to be the first thing someone sees on entering the space. An inviting table, with comfy seating may be more visually appealing.
  • If conversation and relaxing are more your style – Bring the comfort of your living room outdoors. A couch, loveseat and coffee table gives everyone room to spread out.
  • If intimate conversation with a friends is part of the routine – Set a glider, porch swing or café table off to the side. Or, create an area with a pair of conversation chairs with ottomans and an accent table. You’ll have a more intimate option on the occasions you’re just enjoying morning coffee, or conversation with a good friend.
  • If relaxing with a good book is your secondary focus – A comfy chair and ottoman, lounge chair, chaise, rocking chair or hammock can be tucked away to the side.

3: Adequate Seating

If you have a large family, throw big barbecues or have lots of space to work with look for…

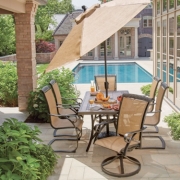
  • A large outdoor dining table. Look for a table that allows for 6-8 people to sit comfortably and still allows room for food and beverages on the table.
  • A bar or buffet. You can serve BBQ buffet style and leave more room at the table.

If you have a smaller family, occasionally entertain larger groups or have some extra space to work with, (but not too much) look for…

  • Picnic tables. Bench seating and the broad, uninterrupted tabletop, makes a traditional picnic table perfect for a casual outdoor dining experience. A painted table and benches can add a fun touch of personality if you want the table to be the focal point of the space.
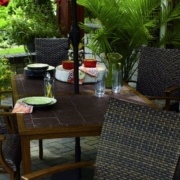
  • A rounded dining table. Look for a dining table that seats 4-6 people comfortably. A medium to larger-sized circular or oval-shaped dining table can save some space. And a clear glass top helps gives the illusion of more space.
  • A folding picnic table. You can set it up when you need it and stow it away when you don’t.

If you mostly entertain 1-2 guests, your gatherings are more intimate or space is very limited, look for…

  • Bistro or Café Tables. They’re a space-saving option for small patios, decks or balconies and fit nicely into almost any nook. Choose one that echoes your interior style. For more of a traditional look, choose wrought-iron or more sculpted shapes and embellishments. For casual tastes the clean lines of a wooden bistro set or a sleek angular shape echoes a modern interior. Add a pop of color or pattern by adding seat cushions.
  • Outdoor Rocking Chairs. A classic piece of outdoor furniture on the porch. And another great opportunity to add a touch of color with paint.

If you occasionally need extra seating, rarely dine outdoors, have more yard space than patio space or you’re more into relaxing than dining outdoors look for…

  • Couches, chairs and ottomans. A living room-style setup will be used more often. You can store stackable resin chairs or folding chairs and tables for the occasions when you need to serve food or seat more people.
  • Park Benches. Outdoor garden benches set up in the yard offer a quiet escape to read a book or an extra spot for mingling guests to sit down for comfortable conversation.
  • Adirondack chairs. Whether on the front porch or in the yard, the allure of an Adirondack chair is its classic style and low, laid-back comfort. Paint them to add a cheerful pop of color to your outdoor space.
  • A hammock. The ultimate symbol of backyard relaxation is a rope or canvas hammock swaying between two trees. Where trees or posts aren’t available, set up a portable hammock so you won’t miss out on your own little slice of heaven.
  • Chaise Lounges. Lay back and enjoy the sun on your face, or your time by the pool. A folding or plastic lounger lets you relax when time allows, and easy stow away storage when you need the space for entertaining.

4: Adding Color and Style

As a general rule, your outdoor living space should be an extension of your home’s style. Treat your deck, porch or patio like an additional room by adding color and style that echo your interior. Look for…

  • Cushions, an umbrella or an outdoor rug. Bring in the colors or patterns similar to your interior upholstery and textiles. Look for materials that are comfortable but repel water and are stain resistant.
  • Accent tables, a single chair, plant containers or yard decor. If you can’t find them in coordinating colors to your interior palette, paint them. Or, here’s where you can add a pop of contrasting color to an overly neutral space.
  • Outdoor Lighting. Outdoor sconces, landscape lights, lanterns or strings of Edison bulbs or party lights can cast a glow on your space and let you continue enjoying the outdoors into the night.
  • Your Style. Connect your outdoor space to your interior with elements that reflect your personal style. Wood and wicker and metal with clean lines suit more modern or casual aesthetics. Bronzed finishes with more ornate finials, shapes and details coordinate with traditional tastes. On a budget? Add personality to your plastic or resin furniture with paint.

5: Create Climate Control

You can’t control Mother Nature by adjusting the thermostat, but you can make your outdoor space comfortable without being chased indoors. Look for…

  • An Umbrella or Gazebo. If you haven’t got shade from the sun’s glare, a classic market umbrella is perfect for smaller areas. Tilting patio umbrellas lets you stay in the shade when the sun moves throughout the day. A large rectangular patio umbrella or portable gazebo accommodates larger spaces.
  • A Fire Pit, Patio Heater or Chiminea. Hot days can cool off into brisk nights. And the glow of a heat source or fire is especially relaxing. Fire pits come in so many styles they’re another good way to add a focal point of interest to your space.
  • Misters or Fans or Misting Fans. You can edge your pergola or ceiling beams with misters or get the refreshing delicate spray or breeze from a portable mister or fan.

STEP 6: Storage

An outdoor furniture set is an investment to protect. Clean it up with an outdoor cleaner. Choose covers or a large storage bin or shed to stow away extra seating or protect your cushions and furniture out of season.


Need Help? Stop by any of our 6 convenient locations on the Outer Banks and our friendly ACE experts will be glad to help:)


Homemade salsa is amazing and the ingredients are easy to grow together in this Salsa Garden. You can make your own salsa using fresh ingredients from this planting plan.